-
5 Amazing Android Apps on F-droid| May 2022
Below are some of the best opensource apps available on F-droid. Please click on the application name to get it.
1. Droid FS
2. URL Checker
3. Stealth
4. QuickWeather
5. SnapDrop
My YouTube Video
If you enjoy my work, do consider subscribing to my YouTube channel by clicking the button below.
Click on the button below to visit my F-droid playlist
-
Best Opensource Apps For Android | April 2022
Below are some of the best opensource apps for Android and all of them are available on Google Playstore as well.
1. Excellent Gallery Application
2. Unique Keyboard
3. Bye Bye Gmail
4. Generate Unique Passwords
YouTube Video Link 👇
-
Flash TWRP Recovery & Pixel Experience in Redmi Note 10 Pro
The main requirement for installing Pixel Experience or any custom ROM is the unlocked bootloader. So, if your device bootloader is unlocked, then well and good, but if it’s not unlocked, please take a look at this article below.
https://techdoc.data.blog/2022/04/07/tips-for-unlocking-bootloader-in-redmi-note-10-pro/
Apart from an unlocked bootloader, you also need to download some files in your pc to go through this installation process.The first file is the platform tools which is a zip file. You can download it from the link below
https://developer.android.com/studio/releases/platform-tools
The second file you would require is the twrp recovery which is an image file specific for redmi note 10 pro. You can download it from the link below.
And the third file is the pixel experience ROM. Please check the download link below.
https://download.pixelexperience.org/sweet
And one more thing to note is to remove any SCREEN LOCK from your device like the PIN, pattern or fingerprint so that you don’t run into any encryption issues.
After you have all these files, let’s take a look at this step by step installation process!
Step 1 is to extract platform tools anywhere in your PC, and you would also require to copy the twrp image file to this platform tools folder. And if you are downloading twrp recovery from the official website, please rename it and keep it short (e.g., twrp) so that it’ll be easy moving forward.
Step 2 is to take your phone to fastboot mode, which can be done by pressing and holding the volume down and the power button at the same time. And when the device is in the fastboot mode, you can go ahead and connect the device to the PC
Step 3 is to open platform tools folder, click on the address bar and type cmd and press enter and this should open a command prompt window.
Step 4 is to check if the device is connected through fastboot mode
You can type fastboot devices in cmd window and press enter and a code should appear here meaning that the device is connected.
Step 5 is to enter the second command which goes like fastboot space flash space recovery space the name of the twrp file followed by .img or you can just drag the twrp image file and press enter, this will flash the image file to your device but this is not the permanent installation.
fastboot flash recovery twrp.img
Step 6 is to enter the next command which goes like fastboot space boot space twrp file name followed by .img or you can again drag the twrp file here and press enter, this should boot your device to TWRP recovery. And please do not disconnect your device from your pc right now.
fastboot boot twrp.img
When the device is booted to TWRP recovery, it should show your device storage in your pc, both internal as well as external if you have sd card inserted.
Step 7 is to copy the twrp image file from your pc to your device storage. You can place it anywhere, internal, or external.
Step 8 which the last step in TWRP recovery installation and requires your device only. While the device would be in TWRP recovery mode, you have to tap on install and select the storage where you placed the twrp image file, tap on install image and select the image file. Since we are installing twrp as a recovery, you have to select the recovery option and swipe to confirm flash. Now the TWRP recovery is permanently installed in your device. You can go back and reboot to recovery or you can flash pixel experience directly.
For installing pixel experience, you need to wipe the data before installation
Tap on wipe, format data type yes and tap okay
If you have pixel experience in your sd card, it won’t be formatted and you can simply flash pixel experience from your sd card.
And If you had pixel experience in your internal storage, you would need to transfer pixel experience rom to your internal storage again and flash it normally.
After you flash the rom, you can simply tap on reboot system and the device will be booted to pixel experience.
Below is the complete installation video.
-
Delete system applications from Vivo Iqoo 3 (or any other Vivo device)
As we already know, Vivo devices come with a lot of preinstalled bloatware like Google and Facebook services as well as some applications from Vivo which cannot be uninstalled directly. So, below I’ll be explaining a method through which you can delete those system applications and enjoy a clean android experience and that too without rooting your device. Please keep a note that this process requires a PC/Laptop.
1. Enabling developer options in your device: which can be done by going to your device settings > my device > more parameters and tapping on the software version multiple times until you get a pop-up saying that you are a developer now.2. Once the developer options are enabled, you can go to the device settings again, then system management, then developer options. You can enable the developer options if not enabled. You also need to enable USB debugging in the developer options in order to run this process.
3. That’s all you need to do with the android device. Now you need to download a zip file on your Laptop/PC known as “platform-tools” from this link: https://developer.android.com/studio/releases/platform-tools
4. Once you download the platform tools, extract anywhere in your system and open the extracted folder. In the meantime, you can connect the device to your PC/Laptop. Upon connecting the device to the PC, a popup will appear on your phone screen and you need to allow USB debugging.
5. On the top address bar of the “platform tools”, type ‘cmd’ in order to open the command prompt window.
6. Type this command and press Enter> adb devices (a code will appear in the command prompt window which means the device is connected through adb mode)
7. Type this command and press enter > adb shell (to generate another command).
8. Now, there are 4 different commands that you can use here. One is for uninstalling the system app, one is for disabling, one more for freezing and the last one for reinstalling any app back to your device. All 4 commands are as follows:
Uninstall: pm uninstall –user 0 <package name>
Freeze: cmd appops set <package_name> RUN_IN_BACKGROUND ignore
Disable: adb shell pm disable-user –user 0 <package name>
Re-install: cmd package install-existing <package name>9. If by mistake you are deleting any application from your device, you need to enter the re-install command in order to bring that application back to your device. Also, if you press a command for deleting an application and you see that it shows ‘FAILURE’, it means that particular app is not present in your device and you can proceed with deleting other applications.
10. Below is the list of applications (package names) that are safe to delete from your iqoo 3 (or any other vivo phone):
Facebook
com.facebook.appmanager
com.facebook.services
com.facebook.systemGoogle apps
com.google.android.apps.docs | Google Drive
com.google.android.apps.maps | Google Maps
com.google.android.apps.photos | Google Photos
com.google.android.apps.tachyon | Google Duo
com.google.android.feedback
com.google.android.gm | Gmail
com.google.android.googlequicksearchbox | Google search widget
com.google.android.marvin.talkback | Talkback
com.google.android.music | Google Play Music
com.google.android.printservice.recommendation | Mobile Printing
com.google.android.syncadapters.calendar | Calender sync
com.google.android.syncadapters.contacts | Contacts sync
com.google.android.tts | Text-to-speech
com.google.android.videos | Google Play Moviews & TV
com.google.android.youtube | YouTube
com.google.ar.lens | Google Lens
com.google.android.apps.youtube.music | Youtube MusicVivo apps
com.android.chrome | Chrome Browser
com.android.filemanager | Google Files app
com.android.VideoPlayer | Video Player
com.android.bbkcalculator | Calculator app
com.android.BBKClock | Clock app
com.android.bbklog | Log Collection
com.android.bbkmusic | i Music
com.android.bbksoundrecorder | Sound Recorder
com.bbk.account | Vivo account
com.bbk.calendar | Vivo Calendar
com.bbk.cloud | Vivo Cloud
com.bbk.iqoo.logsystem
com.bbk.photoframewidget | Photo widget
com.bbk.scene.indoor | My House app
com.bbk.theme | i Theme
com.bbk.theme.resources | Theme Store
com.vivo.childrenmode | Kids Mode
com.vivo.website / com.iqoo.website | Opens Vivo/Iqoo website
com.vivo.appstore | Vivo App Store
com.vivo.browser | Vivo Wen Browser
com.vivo.easyshare | Easy Share
com.vivo.email | Email app (not Gmail)
com.vivo.weather | Weather app
-
Tips for Unlocking Bootloader in Redmi Note 10 Pro
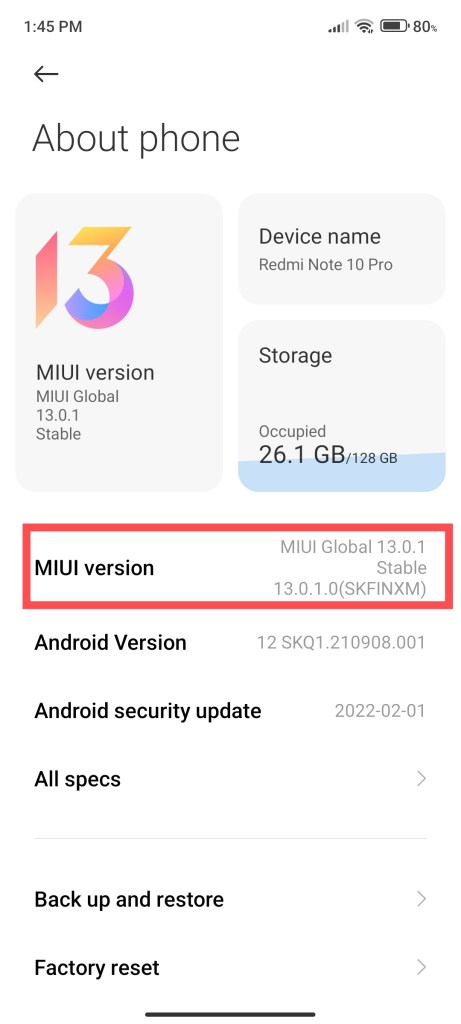
Enabling Developer Options in Redmi Note 10 Pro 1. Enable developer options: Go to the device settings, then about phone and tap on MIUI version multiple times until you get a pop-up saying that you are a developer now.
2. Enable USB debugging and OEM unlocking: Go to the device settings, then additional settings then developer options and enable USB debugging. Enable OEM unlocking as well.
3. Mi Unlock Status: Under developer options, you will see an option called Mi Unlock status. Open it and add your account and device.
NOTE: For adding your device, TURN OFF WIFI and use the MOBILE DATA
Additional Tips: Please make sure that the Mi account in your device is linked to the same sim card you are currently using otherwise it will be difficult to unlock the bootloader (it will be impossible)
4. Now go to https://en.miui.com/unlock/download_en.html and download Mi Unlock tool for your device and save it in your laptop or a PC. You can also search ‘Mi Unlock Tool’ on Google and open the first link (official link) that is displayed in the search results.
Mi Unlock Tool is a zip file, please extract it anywhere in your laptop.
5. You can open Mi Unlock Tool and login using the same Mi account that is present in your device. You will receive an OTP so make sure to keep the device unlocked and switched ON.
6. After you login on your PC, take the device to FASTBOOT mode by pressing the VOLUME DOWN and POWER BUTTON together. Connect the device to your pc through USB cable and press unlock on Mi Unlock Tool in your PC. The bootloader will be unlocked, and the device will restart.
Please NOTE that unlocking bootloader will erase all the data in your device, so make sure to take a backup.
What if the above method does not work and the unlock tool tells you to wait for 168 hours?
No other option is there but you have to wait. Do not add your Mi account again in your android device (Mi unlock status), otherwise the waiting time might increase. Wait for the given time but try this new method now after the waiting time is over!
– Copy and paste the Mi Unlock Tool folder in the C drive of your laptop or a PC.
– Run the PC with Test Mode
How to go into test mode?
Search for command prompt in the windows search bar
Run the command prompt as an administrator
Type this command – bcdedit /set testsigning on – press enter
Now restart your PC
Once the PC is on, you will see that windows in running in test mode.Text will appear at the bottom right corner of your laptop/PC homescreen.
– Now open your C-drive where you copied the Mi Unlock Tool folder
– Run Mi Unlock Tool as an administrator
– Follow the steps as mentioned in the beginning, you should be good to go.Performance Review of Pixel Experience for Redmi Note 10 Pro

About Me
The sky is not completely dark at night. Were the sky absolutely dark, one would not be able to see the silhouette of an object against the sky.
Follow Me On
Subscribe To My Newsletter
Subscribe for new travel stories and exclusive content.
